

Is error 0x0003 interfering with your ability to use NVIDIA GeForce Experience? If you’re having trouble with this, you’ve come to the right place. Let’s take a deep look at what causes this error code and how to resolve it. Typically, the NVIDIA GeForce Experience error 0x0003 occurs when you attempt to update your drivers for a newly launched game.
Fix GeForce Experience Error 0x0003 On Windows 10
1. Close All NVIDIA Processes
Running all NVIDIA background processes may resolve this problem. However, if one of these processes becomes stuck, it may cause the others to become blocked as well.
1- Launch the Task Manager.
2- Next, select the Processes tab.
3- Right-click on the NVIDIA processes that are currently running (one by one).
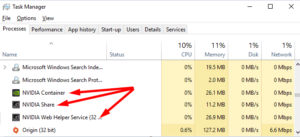
4- Then click End task.
5- Reboot your computer and check that the error 0x0003 has been resolved.
2. Enable And Restart All NVIDIA Services
Allowing and restarting all NVIDIA services listed in the Services app should resolve the issue. If one of the services becomes unresponsive, restarting it should fix the issue.
1- In the Windows Search bar, type ‘Services.’
2- Then, double-click the Services app to launch it.
3- Scroll down to find all available NVIDIA services on your computer.
4- To begin, verify that their status is set to Running. This indicates that the relevant services are operational on your device.
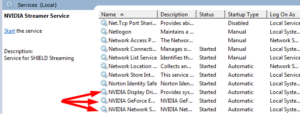
- If the Service Status is set to Stop, you must restart the service manually.
5- Right-click each NVIDIA service to bring up the context menu and choose Refresh.
6- check that the error 0x0003 persists.
Other users were able to resolve this problem by changing the startup type of all NVIDIA services to Manual. Well, This can be accomplished by right-clicking on your NVIDIA service and selecting Properties. Then, using the drop-down menu, set Manual as the Startup Type.
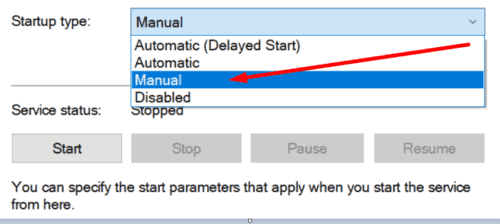
If you accomplish this, keep in mind that you will need to start each of these services manually.
3. Disable Background Processes
Other programs running in the background may cause your GeForce Experience app to malfunction. Reopen the Task Manager and terminate all inactive programs and processes.
For instance, if you’re not using Microsoft Edge while playing your favorite game, simply close the process.

4. Check Your NVIDIA Install Location
The error 0x0003 may appear if you initially installed NVIDIA on a different drive but later changed the app’s location. For instance, suppose you initially installed NVIDIA on your C: drive. However, you edited the Registry and redirected NVIDIA to the D: drive.
When you next update GeForce, your computer will automatically install all of Nvidia’s files on your D drive. However, the NVIDIA Telemetry Container service will continue to use the C: drive as a reference.
To resolve this issue, you must point the container to the proper drive. Then, you have two options: reinstall everything or tweak your Registry once more.
Alternatively, you can combine these two suggestions.
1- Begin by uninstalling GeForce.
2- After that, open the Registry Editor and navigate to the key HKEY_LOCAL_MACHINE\SOFTWARE\Microsoft\Windows\CurrentVersion.
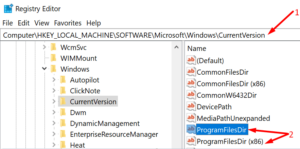
3- Edit the ProgramFilesDir so as to point from D:\Program Files to C:\Program Files.
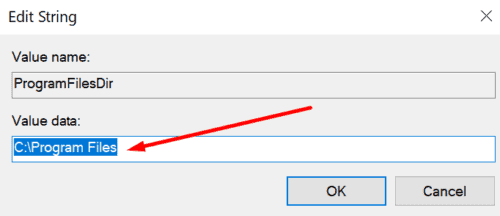
4- Do the same for the ProgramFilesDir (x86) folder. It needs to point from D:\Program Files (x86) to C:\Program Files (x86).
5- Reboot your computer and reinstall GeForce Experience to the C: drive.
Additional Fixes Suggested By Users
Deactivate Your VPN.
Switch off any VPN software you’re using. Then, check to see if this quick workaround worked for you.
Install The GeForce Experience App.
According to some users, you do not need to reinstall GeForce. Alternatively, you can re-download the GeForce Experience app from the NVIDIA website’s main page.


