

Taking a screenshot is sometimes essential or useful for recording and storing data from the device. As a result, we’ve listed the procedures for taking screenshots in Windows 10 below.
Take Screenshots In Windows 10
Most people find themselves needing to take Snapshots in Windows 10 while attempting to fix an issue on their system with the assistance of an online buddy who may require a snapshot of any error message on your system.
Furthermore, being ready to obtain snapshots in Windows 10 can prove to be helpful when you need to snap a photo of your system’s list of data, want to capture an image on your system to send to your family or friends, and a variety of other situations. So, let’s have a look at some of the several ways to take screenshots in Windows 10.
How To Take Screenshots In Windows 10 Of The Entire Screen
Capturing the entire display of your system is a breeze with Windows 10. All you have to do is hit the designated Print Screen key on your system’s keyboard in conjunction either with the Windows or Function button.
The Print Screen button is commonly named Print Scr, PrntScr, or PrntScrn on many of these keyboards, and it is positioned towards the far right corner of the keyboards.
1- Hold the Windows button, and then hit the Print Scr key on your keyboard’s top-right corner.
2- When you hit the right keyboard shortcut, the screen dims for a brief while, signifying that your system’s complete display has been stored in a snapshot.
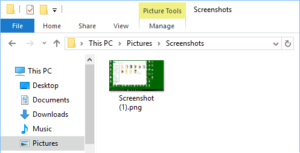
3- Next, go to This PC > Pictures > Screenshots Folder to view the snapshot of your complete display that you just captured.
How To Take Screenshots In Windows 10 Of A Specific Part Of The Screen
Windows 10’s Creators Update included the potential to take screenshots of specific areas of the screen.
1- Press Windows + Shift + S. The display will get greyed out on your system’s keyboard, and the mouse pointer will turn into a cross-hair form.
2- Hit the left mouse button, then move your mouse over the display to pick the area you wish to save. Release the Mouse Key once the area has been chosen, and a snapshot of the specific range will be saved to the Clipboard.
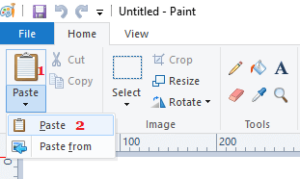
3- After that, open Paint and paste the snapshot by pressing Ctrl + V or selecting Paste Icon > Paste from the Paste Icon menu.
How To Take Screenshots In Windows 10 Of The Entire Screen And Save Them To The Clipboard
Rather than saving the screenshot to the Pictures folder, you can save it to the Clipboard.
1- Simply hit the Prnt Scr button on your system’s keyboard. This will capture a snapshot of your system’s complete display and save it to the Clipboard.
2- After that, you can Paste the Clipboard content into Paint, Word, or any other program.
3- In Paint, select the Paste icon and then the Paste option from the small drop-down menu that displays.

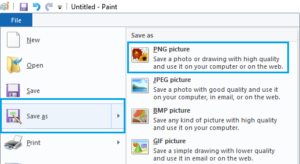
4- After that, go to File > Save As to save the file in PNG, JPEG, or other types.
How To Take Screenshots In Windows 10 Of The Active Screen
If you have several displays linked to your system, the Prnt Scr or Win+Prnt Scr keyboard combination takes snapshots of both displays.
In this instance, you can only take screenshots of the active display by pressing Alt+Prnt Scr. In this situation, though, the snapshot will just be saved to the Clipboard and will not be stored in the screenshots directory instantly.
As a result, you’ll need to launch an application like Paint and paste the snapshot before saving it following the techniques outlined above.
How To Take Screenshots In Windows 10 Using The Snipping Tool
In case you didn’t know, Windows 10 contains a built-in Snipping Tool that allows users to take snapshots of the entire screen as well as selective parts on your system’s display.
You can use the snipping tool to take snapshots of a rectangular region, a free-form area, or the whole display. You can also use multicolored pens or highlighters to annotate the snapshots.
The generated screenshots or snippets can be stored in any directory on your system or sent to any of your contacts right away.
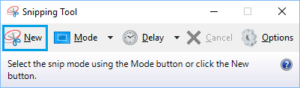
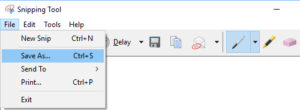
1- Click Start > Windows Accessories > Snipping Tool to launch the Snipping Tool on your PC.

2- Select the New option from the Snipping Tool pop-up box.
3- When you click “New,” the screen fades, and the mouse pointer transforms into a cross-hair form. Holding the Mouse key and moving the pointer all around the region will allow the user to select the region you wish to take in a snapshot.
4- Release the Mouse Button once the required region has been chosen, and the snapshot will be saved to the Clipboard.
5- Then, within the Snipping Tool, go to File > Save As to save the snapshot to any folder on your system.
How To Take Screenshots In Windows 10 During Game Play
If Game Mode is activated on your system, you can also use the Xbox app to take snapshots while playing games on your system.
While playing computer games on your system, Windows 10’s Gaming Mode allows users to take pictures and even film Game Play Footage.
But, you must first activate Game Bar and the option of taking snapshots when playing games in Windows 10’s settings.
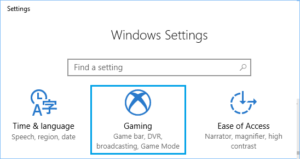
1- Open the Settings menu and select Gaming from the drop-down menu.
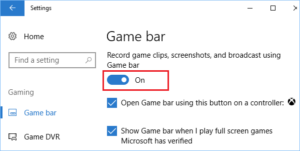
2- Toggle ON the option to Record Game Clips, Screenshots, and Broadcast Using Game Bar on the next screen by clicking Game Bar in the menu bar.
After that, you’ll be able to use the Xbox app on Windows 10 to capture snapshots and record gameplay footage while enjoying video games.
3- You may activate the Game Bar at any moment while playing computer games by hitting Windows + G buttons, and you can take a screenshot while playing the game by clicking on the Camera icon on the Game Bar or pressing Windows + Alt + Prnt Scr keys.

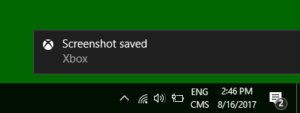
4- After taking a screenshot, you’ll receive a notice that says “Screenshot Saved,” indicating that the image has been stored in your system.
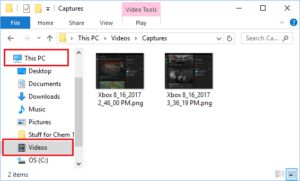
5- Navigate to the This PC > Videos > Captures folder on your system to see the stored snapshot.
Also, Check :


